Generating Your Hogwarts Acceptance Letter Using Muggle Technology
Frustrated the you got an email instead of an owl? Wish to have a physical copy of your Hogwarts Acceptance Letter to frame and hang on your wall, but confounded by Muggle computers? This short pamphlet will guide you through how to transmogrify that digital correspondence into an actual printed letter you can show off proudly (to anyone other than Muggles, that is). WORK IN PROGRESS, will be completed around 05/09/14 (US dating system) at the latest. The chapter on using Microsoft Paint is COMPLETE, with the chapter for GIMP coming later this week.
Last Updated
05/31/21
Chapters
2
Reads
5,420
Printing With Microsoft Paint
Chapter 2
STEP 1: Open your Hogwarts email that contains your acceptance letter.
Make sure that you have the e-mail program window expanded to its fullest extent, so that it fills your whole monitor screen, like so (shown in Google Mail):
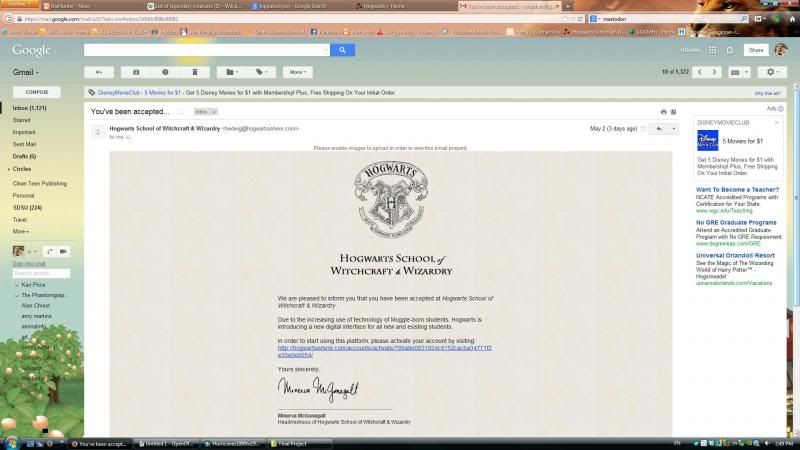
Make sure that the entire text in the acceptence letter image is showing on your screen, as shown above. If it does not, you will not be able to capture the image properly and it will not print correctly.
STEP 2: Press the "Print Screen" button on your computer keyboard.
This button is located toward the upper right hand corner of the keyboard, and probably has the text "Prt Scr Sys Rq" on it. When you press this button, you will not see anything happen; this is normal. What it does is copy the image to your computer's internal clipboard so that you can use it in other programs.
STEP 3: Open the Microsoft Paint Program.
If you do not know where this program is located on your computer, press the Start button in the lower left-hand corner of the screen, and type the word "Paint" in the search box:
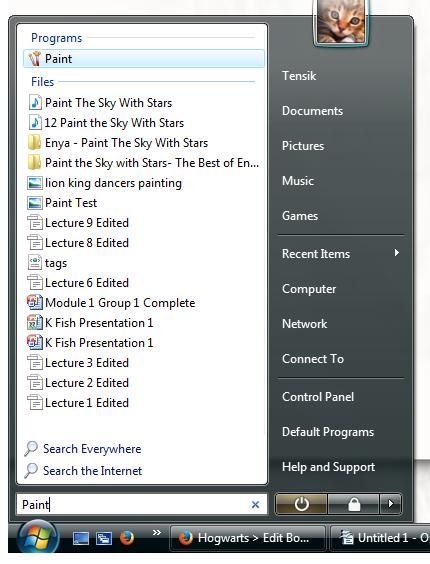
The above image was taken in Windows Vista; your operating system version may differ so what you see may be slightly different, but the process is the same. Note: I do not have access to a Windows 8 system, so am not sure how this works on such. If you use Windows 8, please use the process that you would use to locate any program or file on your computer by searching for "Paint".
As you can see, the Paint program appears right at the top of the list under "Programs". Double click on this to launch the program, and this is what you will see:

If the program does not open so that it takes up your whole screen, then maximize the window so that it does; it will make the next steps easier.
STEP 4: Copy the email image into Paint.
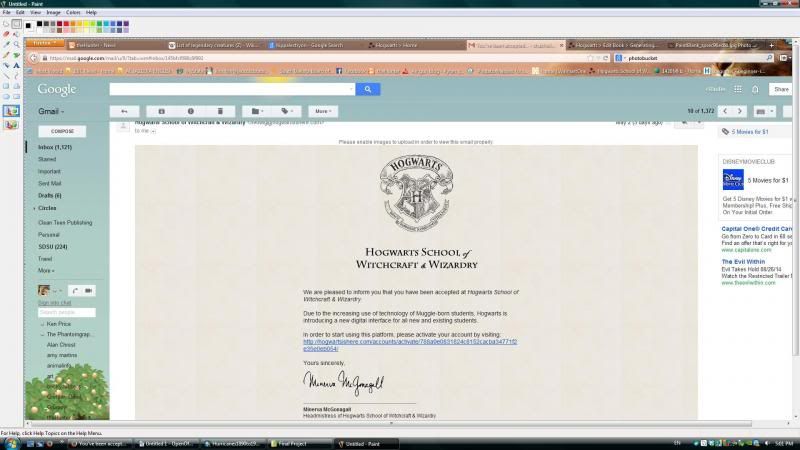
This is much easier than it sounds. In the above image, you can see a large white rectangle. That is like a blank canvas (actually that is exactly what it is, just in digital form). To make your email appear on this canvas, hold down the Shift button and press Insert (the button on the right side of your keyboard that says "Ins" on it) at the same time. Voila! Your email will (not so) magically appear in Paint, like this:
STEP 5: Crop the image.
If you move your mouse cursor around the screen, you will see that it looks like two crossed arrows with pointers on all four ends. Unfortunately the cursor does not appear in screen grabs, so I cannot show an example here. When you cursor looks like this, it means that you can drag the image around the canvas in Paint. Move your image over to the right hand side so that you have a white part appearing to the left, but ensure that you can see your entire acceptance letter text, like so:
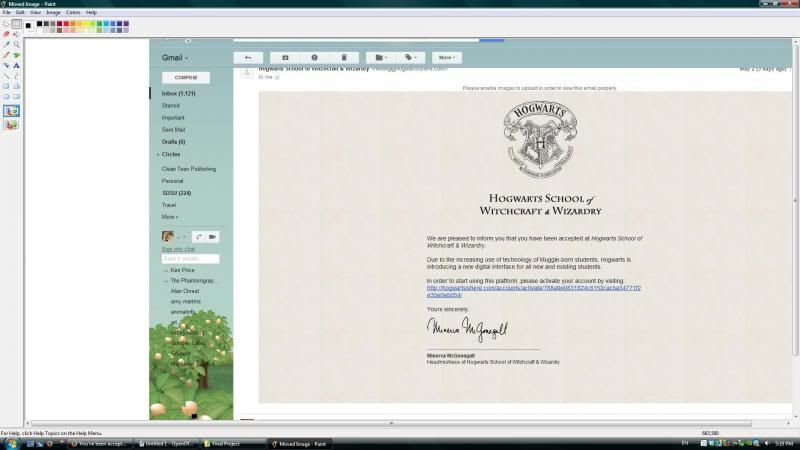
Doing this is not a NECESSARY step, but it makes it much easier to select the proper tool to crop the image.
Click on the white area to the left of your image. This will change your cursor to thin lines with a target reticule in the center.
Next you will choose the selection tool to crop your image. The Paint tools are in the upper left hand corner of the screen, in two vertical columns. You want to select the tool at the top of the right hand column, which is the rectangle button that you see "depressed" here:

Next, you will select the area of the image that will be cropped. You will do this by left-clicking at the top left corner of your e-mail image, and holding down the left mouse button, dragging the rectangle you create to the lower right hand corner of the image. Only select the area that you want to appear in your printed letter, like so:
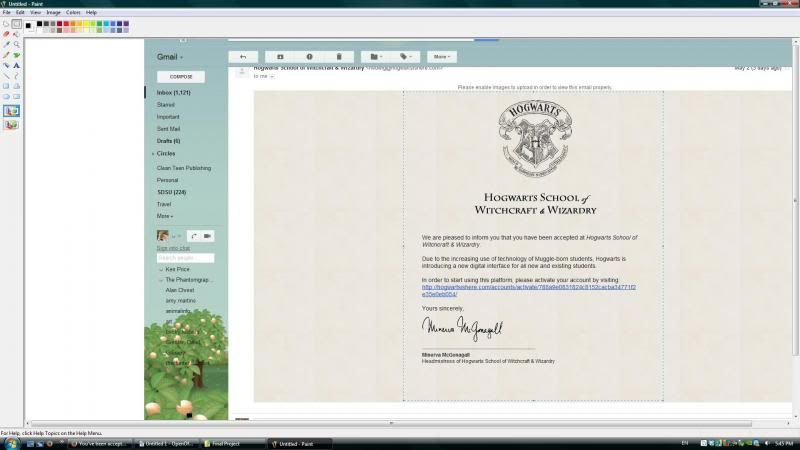
You can (barely) see the blue outline of the area that will be cropped. Cropping an image removes elements that you do not want to appear from a screenshot or picture; in this case, all that other stuff on the screen from Gmail. If you look carefully on your screen in Paint, you will see slightly larger blue dots in the corners and the centers of the blue lines. Hover over these blue dots, and your cursor will turn into a directional arrow that allows you to click and drag the outside edges of the blue box you created, to better size the area you will crop out. Once you are happy with how your blue bounding box appears, click "Image" at the top left side of the screen, and in the dropdown menu that appears, click "Crop". Everything will disappear from your image, except what was in the blue box:
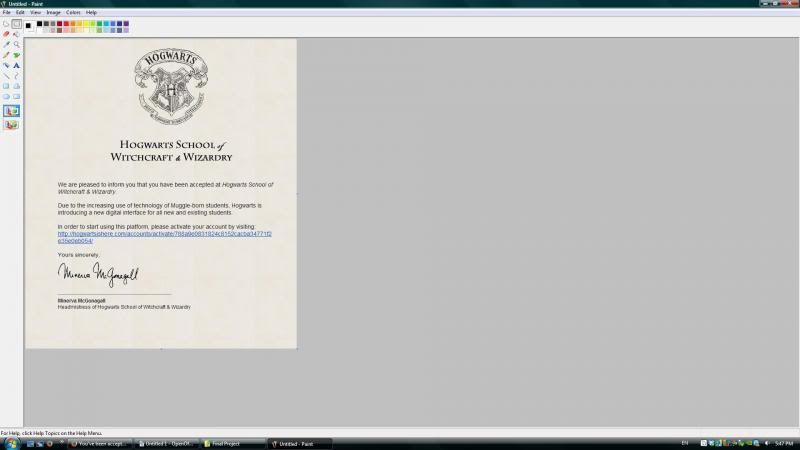
Now, doesn't that look MUCH more like a traditional letter from Hogwarts?
Step 6: Save your new image.
Your new copy of your letter is not going to do you any good unless you save it somewhere. Put your wand down; you cannot pluck it off of your monitor and save it in a box or the like. You will need to save it on your hard drive. To do this, do the following:
In the upper left hand corner, click "File", and then in the new dropdown menu, click "Save As". A new window will appear:

Change the location you are saving it to to something you will easily be able to find again. You do this by clicking the little black arrows in the directory bar (in the image above, it says >Folders >HIH Stuff because that is where I store the images that went into this book) and selecting the place you want your file to go. If you are not familiar with working with folders, I highly suggest changing this to your desktop by clicking on the left-hand black arrow and selecting "Desktop" from the dropdown. That way your acceptance letter will be right on your desktop where you can easily find it.
In the field that says "File Name", type in the name that you want to give your image file. Make it something easy to remember that uses numbers and/or letters. Windows does not like certain characters in file names so naming it &*&%&^)(%$#!@#$%~%&*&^ would not work well.
In the "Save as type", click the dropdown box and select PNG as shown above. Other file types will work, but this file format will save the image in the best clarity for printing.
Once you are done, press "Save".
STEP 7: Print your letter.
This of course assumes that you have a printer; if you do not, you can likely print this off at your Muggle school, your local Muggle library, or a print and copy shop. The latter will also have the means to print it off on nice paper if you so choose.
If you are printing from home follow these steps:
Double-click on your image file wherever you saved it. It will open in your default image viewer, which if you have not changed it, is likely to be Windows Photo Gallery. If your image opens in another program, you likely are familiar enough with computers to figure out how to print it from there. Here is a screen capture of my letter in Photo Gallery:
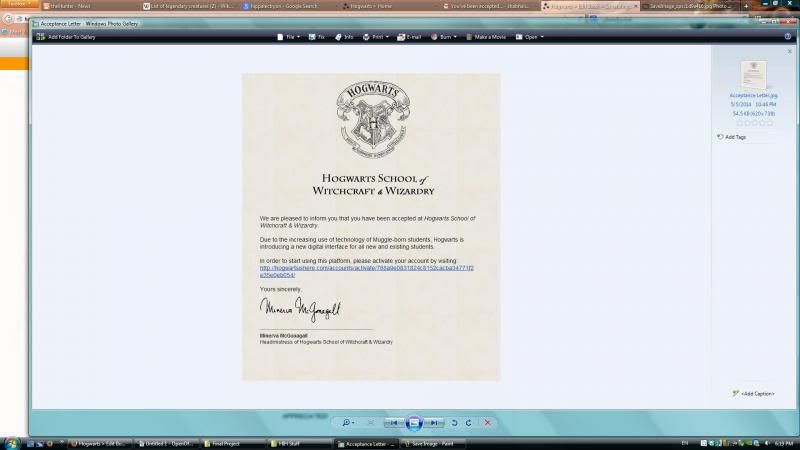
In the center top menu, click "Print", and then "Print" again from the dropdown menu. You will get a new window that looks like this:
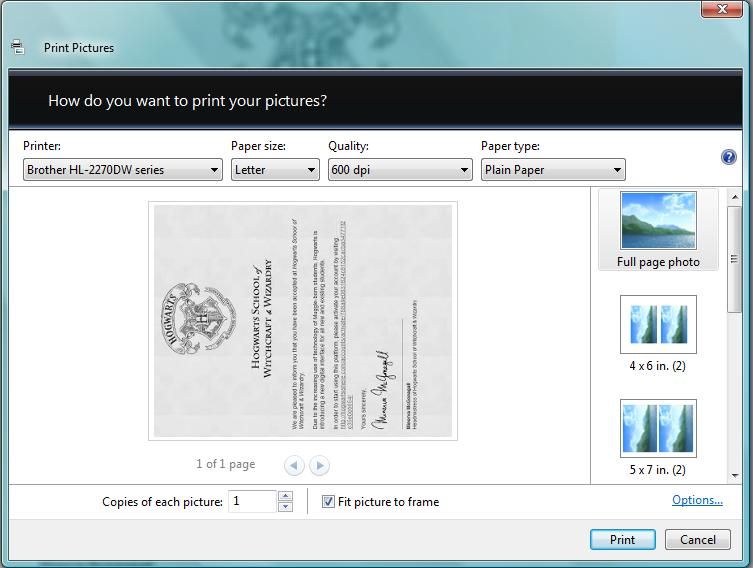
Make sure that the following are selected:
The printer that will print your letter. This will probably default to your home printer, so do not change it unless you know it is wrong (like you are printing from a laptop that you usually use at Muggle school, and it is defaulting to a school printer). If it is incorrect, click the dropdown and select the proper printer.
Paper size: This will likely default to "Letter", which is your standard paper in any printer. Leave this one alone unless it says something else.
Quality: Your options will be 300, 600, and 1200 dpi. "dpi" stands for "dots per inch"; the more dots per inch, the clearer your image will be. Note: all ink jet printers will look a bit fuzzy when they print on paper no matter what. Laser printers will print more clearly. Set your dpi for either 600 or 1200 dpi.
Paper type: There are a lot of options here, but more than likely you are going to print on plain paper. Leave this one alone unless it does not default to "Plain Paper".
You will also want to be sure that "Full page photo" is selected at the right, that you have the copies of each picture set to the number you want (only print one at first until you are sure how it will turn out) and that "Fit picture to frame" is checked. When you are ready, press "Print" at the lower right hand corner of the window.
If you do not own a printer: The easiest way to access your image from a school or library to print it there is to email your acceptance letter image to yourself using an email program that you can access from wherever you will be printing your letter. A teacher or librarian can then help you print the image using their software and printers. If you will be printing your letter at a print or copy shop, save your acceptance letter image to a thumb drive or disk, and bring it with you. The sales associate can take it from there.
Step 8: Frame and enjoy! Congratulations! You now have your very own paper copy of your acceptance letter.


